Development Process: How I Develop 35mm Black and White Film
So, I have developed around 16 rolls of film this year and I thought I would add a how-to. This is NOT an end all article to developing black and white…I am a just learning the process myself. However, when I first started looking up how to develop I wanted as many resources as possible before I put together my list of items I needed to purchase to get started with developing. I read as many articles I could find on the actual development process. So, here is my attempt at yet another article on the development process. I hope you find it useful. I know I kept and keep looking for additional articles on the process myself.
When starting this years Roll A Week project I knew that a large part of expenditure would come in on the development process. I figured I could save a lot of cash on processing my own film. But, I also calculated that the first year…with all the gear purchased it could end up a wash. But, year two and on will be drastically reduced compared to sending your negatives out to get professionally process. As of this writing I have processed 16 rolls. At $10 dollars a pop a my local camera store that is $160 dollars saved or rather reallocated to purchasing gear/chemicals for developing my own film.
Also, as of this writing I have spent close to $200-$250 dollars on gear as chemicals. I purchased quite a bit of different chemicals over the course of the past couple of months. Rodinal…I was a little intimidated with development and started my experiments with Rodinal stand development. Early tests proved to be decent, but I wasn’t fully sold on the process. I know, I barely gave it enough to time to learn the chemical, but I knew that all other rolls I shot turned out nicer when sent to the camera shop to develop my negatives in the past. So, I did some more research and decided to mix my Kodak D-76 from powder. By this time I had put a few rolls through the development process and felt a little less intimidated with film development and chemicals. I realized that I needed more containers that I had available to store the chemicals. After I mixed it I also realized that the shelf life is approximately 6 months and possible less if stored in a container that wasn’t completely full. The rolls turned out nice and I was comfortable with the process. But, at the stock 1:0 ratio or 1:1 ratio, I knew I would go through the this stuff pretty quick. I didn’t want to mix every few weeks with the amount of film I was going to develop in the first few months of my film experimentations. So, I looked at other solutions. I found Kodak HC-110 and loved that fact that it is a long lasting syrup that can be used in small amounts per batch. Perfect. I wished I would have searched a little longer during my intitial research period. Oh well, this is a learning process. But, this is also one of the reasons I’m writing this article. I want you to be able to learn from my mistakes. I have found this solution to be manageable and also one that I plan on getting to know a little better. I intend to stick with this HC-110 and start to focus on tweaking my results as this year and my Roll A Week project progresses. So, let’s beging with the list of items needed to get started. This is my list and is all inclusive for the way I process my film…or, at least it’s meant to be…I hope I don’t forget anything.
What to buy:
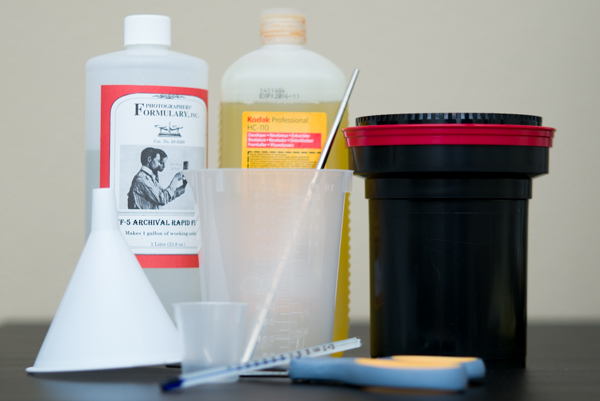
Developing Gear
- Changing Bag
- Developing Tank with Spools (I use and like the Paterson Super System 4).
- Church Key
- Scissors
- 500ml mixing container
- 30ml mixing container
- Thermometer
- Funnel
- Something to stir the chemicals
- Clothes pins or film hangers
- Film sleeves to store the film in after you develop your negatives
Chemicals:
- Kodak HC-110
- Distilled Water
- Photographers Formulary TF-5 Fixer
Optional (If you plan on scanning your photos):
- Scanner
That’s It!
Now let’s start with the process.
I develop 1 film canister per batch even though the Patterson tank I use can hold two spools. Here is my process for Kodak HC-110 mixed with the B ratio of 1:31. I usually get my development times from The Massive Dev Chart (check it out).
- Put your Developing tank, scissors, church key, and film into your light tight changing bag.
- Cut the leader off.
- Roll film onto your spool
- Put the film into your developing tank after loading it onto the spool
- Make sure your developing tank is closed properly
- You can now remove your developing tank from the changing bag.
Get your chemicals ready.
While mixing my chemicals I do a pre-wash with sink water at 20 degrees Celsius. I just fill my tank with the water and let it sit for 3-5 minutes. This step helps your container and film get acclimated to the developing temperature.
Mixing the chemicals
- Pour 465ml of distilled water into your 500ml container.
- Add 15ml Kodak HC-110
- Mix
- Bring chemicals to 20 degrees Celsius.
Development Process
- Pre-wash in 20 degree Celsius sink water for 3-5 minutes
- Pour water out
- Add development chemicals at 20 degrees Celsius into your tank. Pour the entire 480 ml of chemicals into the tank…I usually start my timer as I am pouring the chemicals into the container. For development times check out the Massive Dev Chart to ensure you develop your particular film for the right amount of time
- Agitate for the first minute
- At the two minute mark agitate for 10 seconds
- At the three minute mark agitate for 10 seconds…At this point I let my film stand without further intervention on my part for the rest of the development cycle
- At the end of the development cycle as determined by the Massive Dev Chart I pour the chemicals out…This is a one shot mix and cannot be reused.
- Start a 30 second rinse with sink water at 20 degrees Celsius.
- Pour water out
- Add fixer…I used photographers formulary TF-5 that also acts as a stop bath.
- Agitate for 30 seconds
- At every minute mark agitate for 10 seconds
- At the end of 5 minutes pour the fixer back into the fixer container. The TF-5 mixture can be used several times. I plan on usin it for 10-15 rolls before tossing out and mixing a fresh batch.
- Rinse the film in 20 degree Celsius running sink water for 5 minutes minimum.
- Empty water from canister and rinse with approximately 300ml distilled water (just enough to cover the film) for 30-60 seconds.
- Remove film from spools and hang in a dust/lint free area. I hang a string in my office and attach two clothes pins on top and two clothes pins on the bottom.
- Let the film dry for 2 hours minimum.
At this point to start my scanning process. I have been using a Plustek 8100 with Vuescan software. I am still learning the scanning process, but like the results and feel that I will get greater results and I tweak more settings
I hope you enjoyed the article. If you feel I left anything out please let me know and I will update the process. Again, this is my process and has giving me some pleasing results. Drop me an email and let me know what you think.